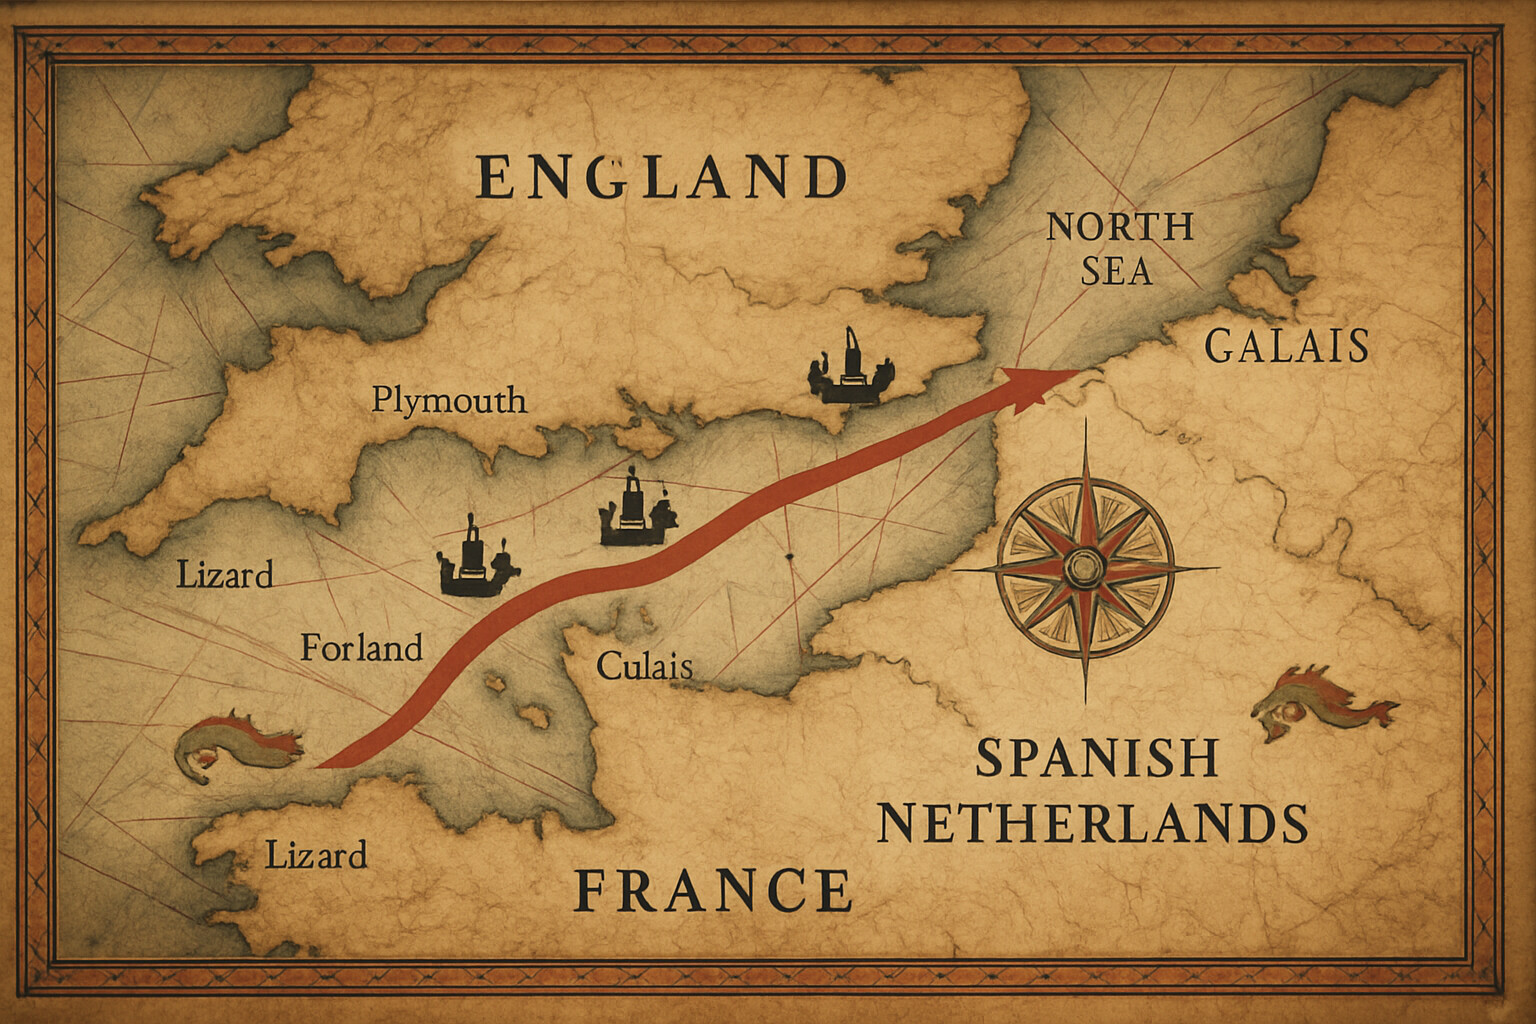
The lookout at Lizard Point saw them first.
It was the evening of July 19, 1588, by the English calendar — July 29 by the Gregorian calendar Spain used — and the horizon to the southwest had turned wrong. Not the clean gray of the Atlantic in summer, but something thick and dark, crowded with canvas. The beacon fires went up almost immediately, the signal chain running north and east along the Cornish coast, carrying the news to Plymouth, to London, to every garrison and harbor master who had spent the better part of two years dreading exactly this.
The Spanish Armada had arrived.
For Lord High Admiral Charles Howard, Baron Howard of Effingham, the news confirmed what his scouts and intelligence contacts had been telling him for months. Philip II of Spain had assembled a fleet of extraordinary ambition: somewhere between 130 and 137 ships, carrying perhaps 18,000 soldiers and 8,000 sailors, with orders to sail up the Channel, rendezvous with the Duke of Parma's veteran army in the Spanish Netherlands — roughly 17,000 experienced troops — and put those soldiers ashore in England. The stated object was the deposition of Elizabeth I and the restoration of Catholic rule. The practical consequence, if successful, would have been the elimination of England as a rival maritime and commercial power and the removal of a Protestant sanctuary for Spain's rebellious subjects in the Low Countries.
Howard was fifty-two years old in 1588. He had not made his reputation as a fighting sailor; he was an aristocrat and a courtier, the son of a lord admiral before him, the cousin of the Queen. His appointment in 1585 had been partly about political reliability — the Crown needed an admiral it could trust absolutely, and Howard was that man. But Howard was also more capable than his detractors acknowledged. He was organized, careful, and — crucially for what was coming — willing to listen to his professional subordinates. The most important of those was Vice Admiral Sir Francis Drake, the most experienced oceanic commander England possessed, a man whose circumnavigation of the globe and raids on Spanish ports had made him famous and had simultaneously made him, in Spanish eyes, a privateer deserving of severe punishment. Howard and Drake formed a command partnership whose combination of social authority and tactical aggression would prove well-suited to the campaign ahead.
The English fleet assembled at Plymouth was formidable but not unlimited. Howard commanded somewhere between 60 and 80 vessels depending on the moment, including a core of Queen's ships — royal galleons built specifically for war — supplemented by armed merchant vessels and smaller pinnaces used for scouting and communication. The Queen's galleons were among the finest warships of their era: relatively low-slung compared to the towering Spanish hulls, faster and more maneuverable, with gunnery arrangements that reflected an evolving English tactical philosophy. Where Spanish doctrine still relied heavily on closing with an enemy, grappling, and fighting a boarding action — essentially a land battle conducted at sea — the English were moving toward a different approach: stand off at range, use heavier long-range guns in sustained broadsides, batter the enemy's hull and rigging, and deny him the close-quarters fight where Spanish tercios had no equal.

The difficulty, in the summer of 1588, was that this doctrine was newer than it appeared and had not yet been tested at scale against a fleet as large and as disciplined as the Armada.
The Armada the English fleet faced was enormous by any standard of the age. Its commander was Alonso Pérez de Guzmán, Duke of Medina Sidonia — a Spanish grandee who, much like Howard, was not primarily a naval professional and who had accepted the command with considerable personal reluctance after the original commander, the Marquis of Santa Cruz, died in February 1588. His letters to Philip II expressing that reluctance survive in the Spanish archives and are among the primary sources for the campaign. Medina Sidonia was organized, conscientious, and brave, but he faced operational problems that no amount of courage could fully solve. His orders required him to proceed up the Channel in formation, avoid a general engagement if possible, and link up with Parma's army at a specific point off the Flemish coast. The Armada was a transportation and escort mission as much as a fighting fleet, and its success depended on a rendezvous between two forces that had no reliable means of coordinating with each other.
The Armada's formation was impressive and deliberate: a roughly crescent-shaped order, the most powerful fighting ships on the flanks, the troopships and supply vessels in the center, designed to resist attack from any direction. Medina Sidonia maintained this formation across more than a week of Channel fighting with considerable skill, and it presented a serious obstacle. Breaking it — or even meaningfully degrading it — would require something more than the running gunnery exchanges that characterized the first days of contact.
On the night of July 19–20, by the English reckoning, Howard made a decision. Rather than wait in Plymouth harbor and allow the Armada to pass his anchorage or bottle him up inside it, he used the night and a favorable wind shift to warp his fleet out of Plymouth Sound and work to windward — south and west — placing his ships upwind of the Spanish. The maneuver required hours of careful seamanship in the dark and gave the English fleet the weather gauge: the tactical advantage of attacking downwind, choosing the moment and angle of engagement, while the Spanish would have to fight against the wind if they wanted to close or maneuver.
The English had claimed the initiative before a shot was fired.
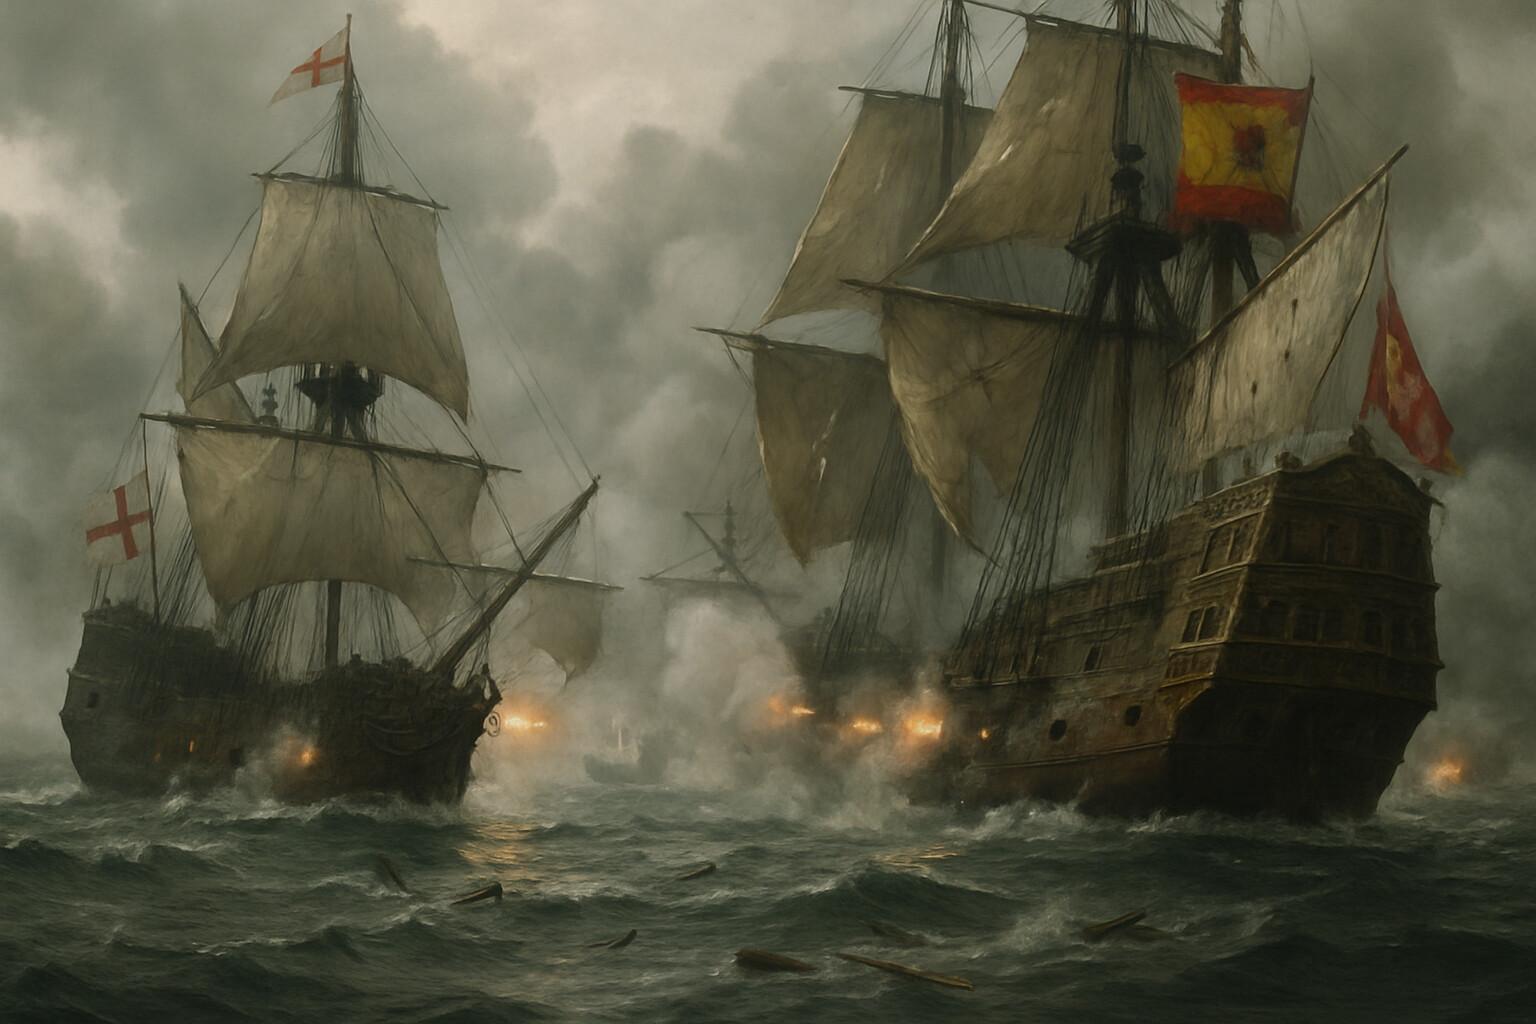
The fighting began on July 21 in the seas off Plymouth. Howard opened the formal engagement by sending his pinnace Disdain ahead to fire a single shot — the conventional challenge — then advanced with his flagship Ark Royal toward the Spanish rear. Drake, in Revenge, attacked the northern flank of the crescent. The gunnery exchange that followed was prolonged and, from the English perspective, frustratingly inconclusive.
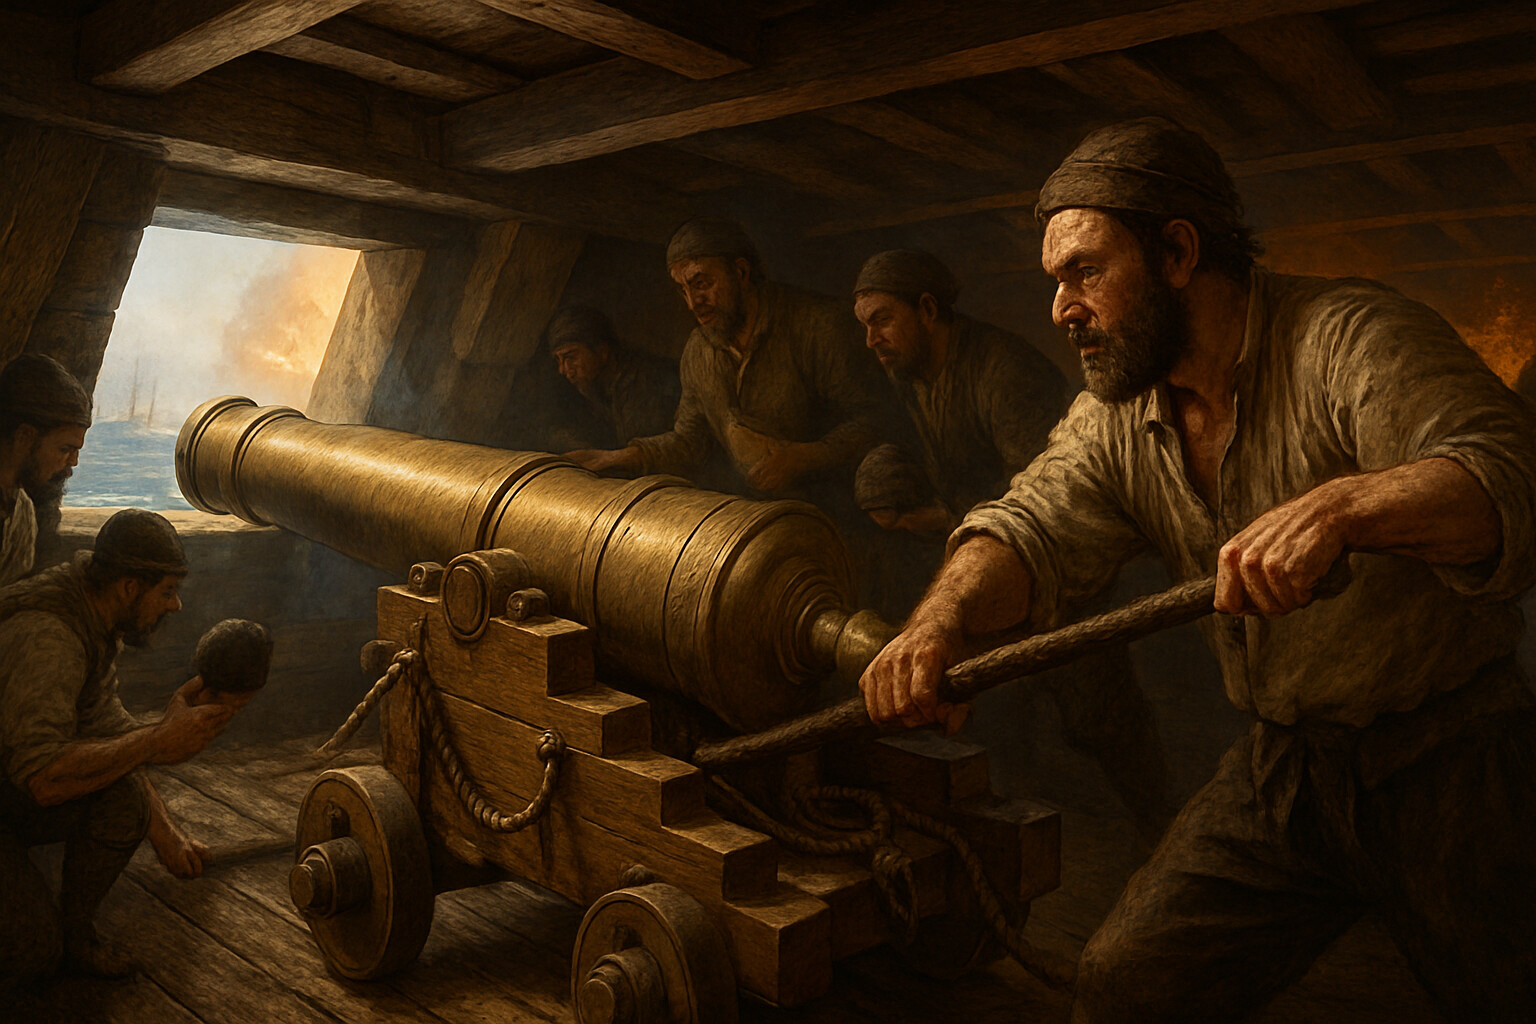
This was the central problem of the Channel campaign, and it deserves careful examination. The English long-range culverins — bronze or iron guns throwing a nine-pound shot for the demi-culverin or a seventeen-pound shot for the full culverin, at effective ranges of several hundred yards — were firing often and, by most accounts, more accurately than Spanish guns at that distance. But the hits they scored were not stopping ships. The Spanish hulls, though battered, were absorbing punishment. The English captains, following their orders to maintain range and avoid boarding, were burning through powder and shot at a rate that alarmed Howard's officers. By the end of the first day's fighting off Plymouth, ammunition expenditure was already a serious concern.
The day's most significant development came not from gunnery but from accident. The Spanish galleon Nuestra Señora del Rosario, flagship of the Andalusian squadron under Don Pedro de Valdés, collided with another Armada vessel during the fighting and suffered catastrophic damage to her bowsprit and foremast. Unable to keep pace with the fleet, she fell astern as night fell. Drake had been assigned to lead the English fleet through the night using the lantern of his ship as a guide. He extinguished the lantern and broke away — his later explanation was that he had seen unidentified ships to the south and gone to investigate. By dawn he had found the crippled Rosario and received Valdés's surrender, along with the ship's treasure chest. The episode drew sharp criticism from Howard and other commanders who had been left to navigate in darkness without their guide. It also relieved Howard of a significant portion of his remaining powder and shot: Drake kept Rosario's supplies for his own squadron. The incident illustrates a tension in English command that ran through the whole campaign — Howard held overall authority, but Drake's semi-independent judgment was both the fleet's greatest tactical asset and an occasional source of friction.
The following day, July 22, brought more gunnery and the same frustrating arithmetic. The Spanish galleon San Salvador, her stern blown apart by an accidental magazine explosion, was taken as a prize. Otherwise the Armada's formation held. Howard called a council of his captains and confronted the ammunition problem directly. The fleet could not sustain its rate of fire without resupply. Urgent dispatches went to the coastal towns asking for powder and shot. The responses were insufficient. For the next several days, English attacks were limited by the shortage of ammunition almost as much as by the strength of the Spanish formation.
The Armada continued up the Channel.
By July 27, Medina Sidonia had anchored his fleet in the roadstead off Calais, the nearest point to Parma's army he could safely reach. The anchorage had problems: Calais roads offered no real shelter, the holding ground was poor, and the fleet was exposed. Medina Sidonia sent urgent messages to Parma requesting that the army embark immediately. Parma's response was that his shallow-draft barges could not put to sea without naval protection against the Dutch flyboats — the fast, handy Protestant vessels that patrolled the Flemish shallows where the Armada's deep-hulled galleons could not follow. The logistical and tactical coordination the entire invasion plan depended on was unraveling. The Armada sat at anchor, waiting.
Howard anchored about a mile to windward and convened his captains again. He needed to break the Spanish anchorage — to force the Armada to sea in disorder. The tool available to him was fire.
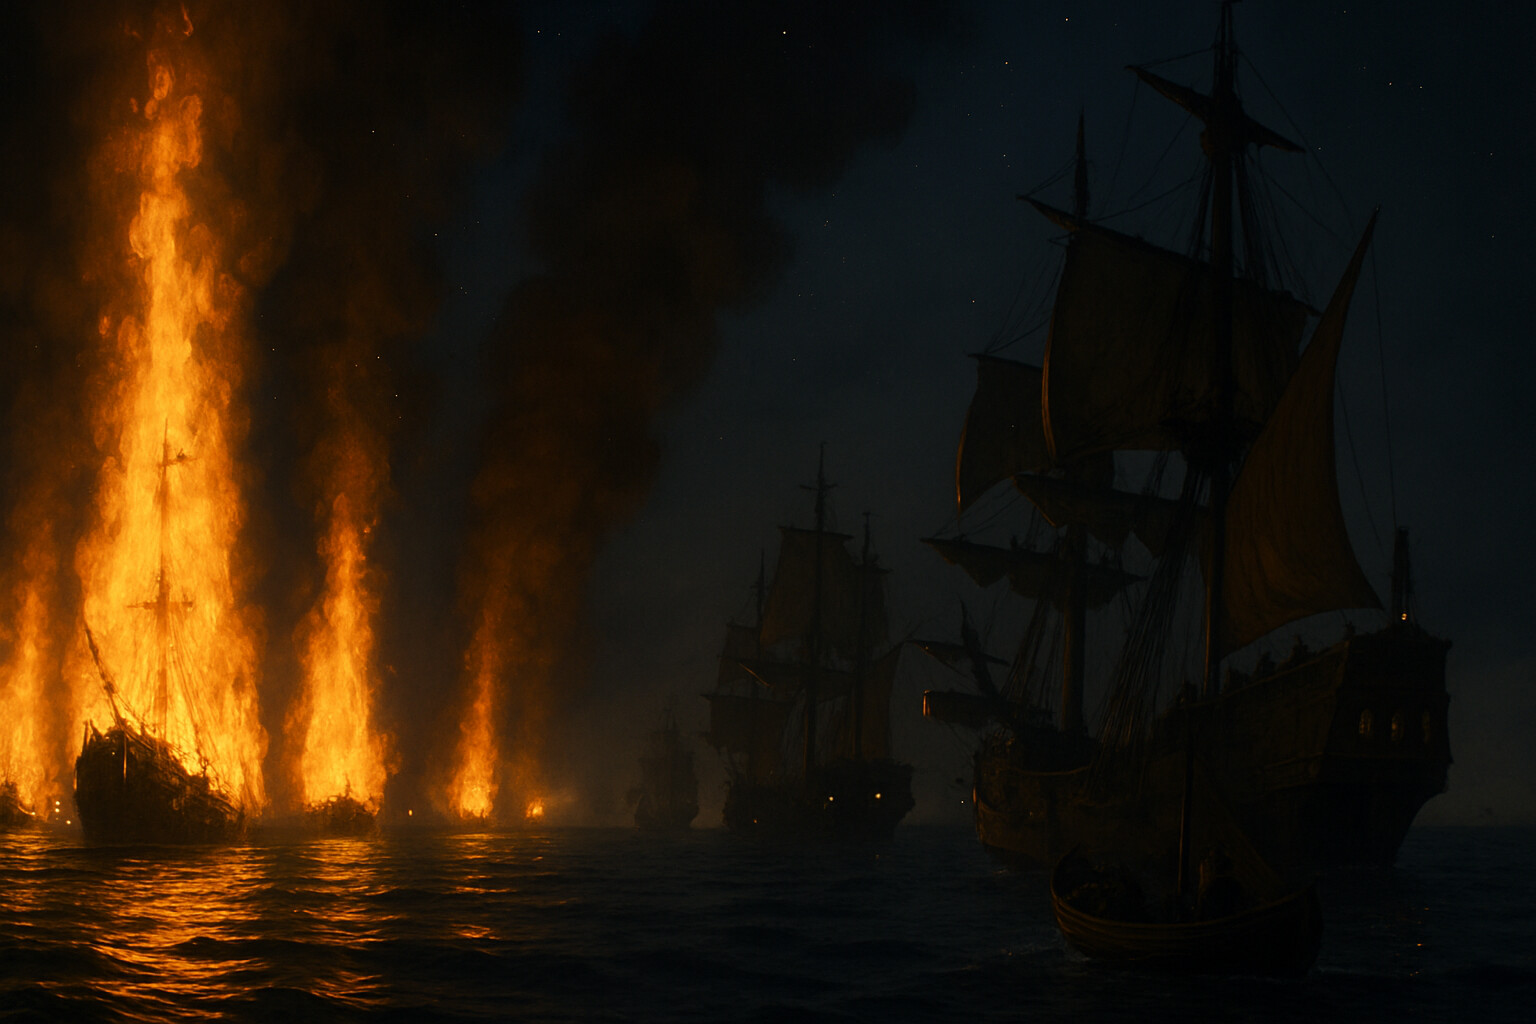
Fireships were not a new idea. Burning vessels had been used against anchored fleets before, most recently and memorably at Antwerp in 1585, where the Italian engineer Federigo Giambelli had built explosive-packed fire vessels — called hellburners — that had destroyed a Spanish bridge across the Scheldt with terrible effect, killing hundreds of Spanish soldiers. The Spanish commanders knew this history very well. When Howard's fleet began preparing fireships on the night of July 28–29, there is evidence in Medina Sidonia's dispatches that the Spanish feared they might be Giambelli-type devices.
They were not. Howard used eight English vessels — the precise ships and which captains contributed them are not fully resolved across the sources, though accounts associate Drake and Hawkins with the effort — loaded with combustibles, their guns charged to fire when heat reached them, their rigging and tarred planking prepared to burn fast. At midnight, the fireships were set alight and sent downwind on the flood tide directly toward the anchored Armada.
Medina Sidonia had prepared for this contingency. He had stationed guard pinnaces ahead of the fleet with orders to grapple any fireships and tow them clear. The pinnaces managed to pull some of the advancing vessels off course. But eight ships burning simultaneously in the darkness, their loaded guns beginning to discharge as the heat reached them, moving fast on wind and tide — it was too many to stop. At least some of the fireships penetrated the Spanish anchorage, and the psychological effect was what Howard needed. Spanish commanders, fearing Giambelli's hellburners, ordered the fleet to cut its anchor cables and scatter.
Cutting anchor cables was a serious and costly decision. Anchors and their cables were heavy, expensive, critical equipment. A ship without her anchor in those shallow, shifting North Sea approaches was in genuine danger. But more important than the material loss was the dissolution of the Armada's carefully maintained formation. In the darkness and confusion, ships that had held together for more than a week in the face of English attack scattered across Calais roads and the sea beyond.
By dawn on July 29, the Spanish fleet was in disorder off Gravelines, on the Flemish coast. Howard pressed the attack.
The Battle of Gravelines on July 29 was the decisive naval engagement of the campaign. Howard's fleet attacked the disordered Armada at close range — closer than the English had previously managed. The culverins and demi-culverins in the English ships fired repeatedly into Spanish hulls that were no longer protected by the tight defensive formation. Three Spanish ships were sunk or driven aground, and several more were damaged so severely they would never reach a Spanish port. The San Martín, Medina Sidonia's flagship, absorbed punishment throughout the battle and survived only through her crew's efforts at the pumps and guns.
Howard's own experience at Gravelines included a decision that has drawn comment from historians. At a critical moment in the battle, he broke away from the main action to take formal possession of a large Spanish hulk that had been disabled and abandoned. The exact reasons are not fully clear from the records. Some historians have attributed it to the conventions of the time, under which a commander's personal prize-taking was accepted practice; others have suggested Howard was ensuring the hulk did not drift back into Spanish hands. Whatever the reason, it drew him away from the main engagement for a period, and Drake and the other squadron commanders continued the action in his absence.
By afternoon, the Armada had taken severe damage and was no longer capable of executing its mission — but it had not been annihilated. Medina Sidonia still commanded the majority of his ships. The English fleet, now almost completely out of powder and shot, could not deliver a final blow. Howard's fleet shadowed the Spanish northward but could not attack.
The wind and the geography of the North Sea now became decisive.
Medina Sidonia's options were few. He could not return down the Channel — the English fleet lay between him and the Atlantic, and the wind was against him. He could not rendezvous with Parma; the invasion plan was dead. He could attempt to shelter in a Scottish or Norwegian port, but these were unlikely to welcome a large Spanish fleet. The only viable course was to go around: north past Scotland, then west and south through the Atlantic approaches to Spain. It was a voyage of more than three thousand miles, through seas the Spanish navigators did not know well, in ships already battered and low on water and provisions.
Howard shadowed the Armada northward until it passed the latitude of the Firth of Forth in early August, then turned south. His fleet had no ammunition remaining, and the threat of invasion was finished. Contemporary accounts report that he signaled his captains not to pursue further north, though the precise form of this communication is not established in the formal documentary record. He sailed for the English coast.
What happened next belongs to the Atlantic.
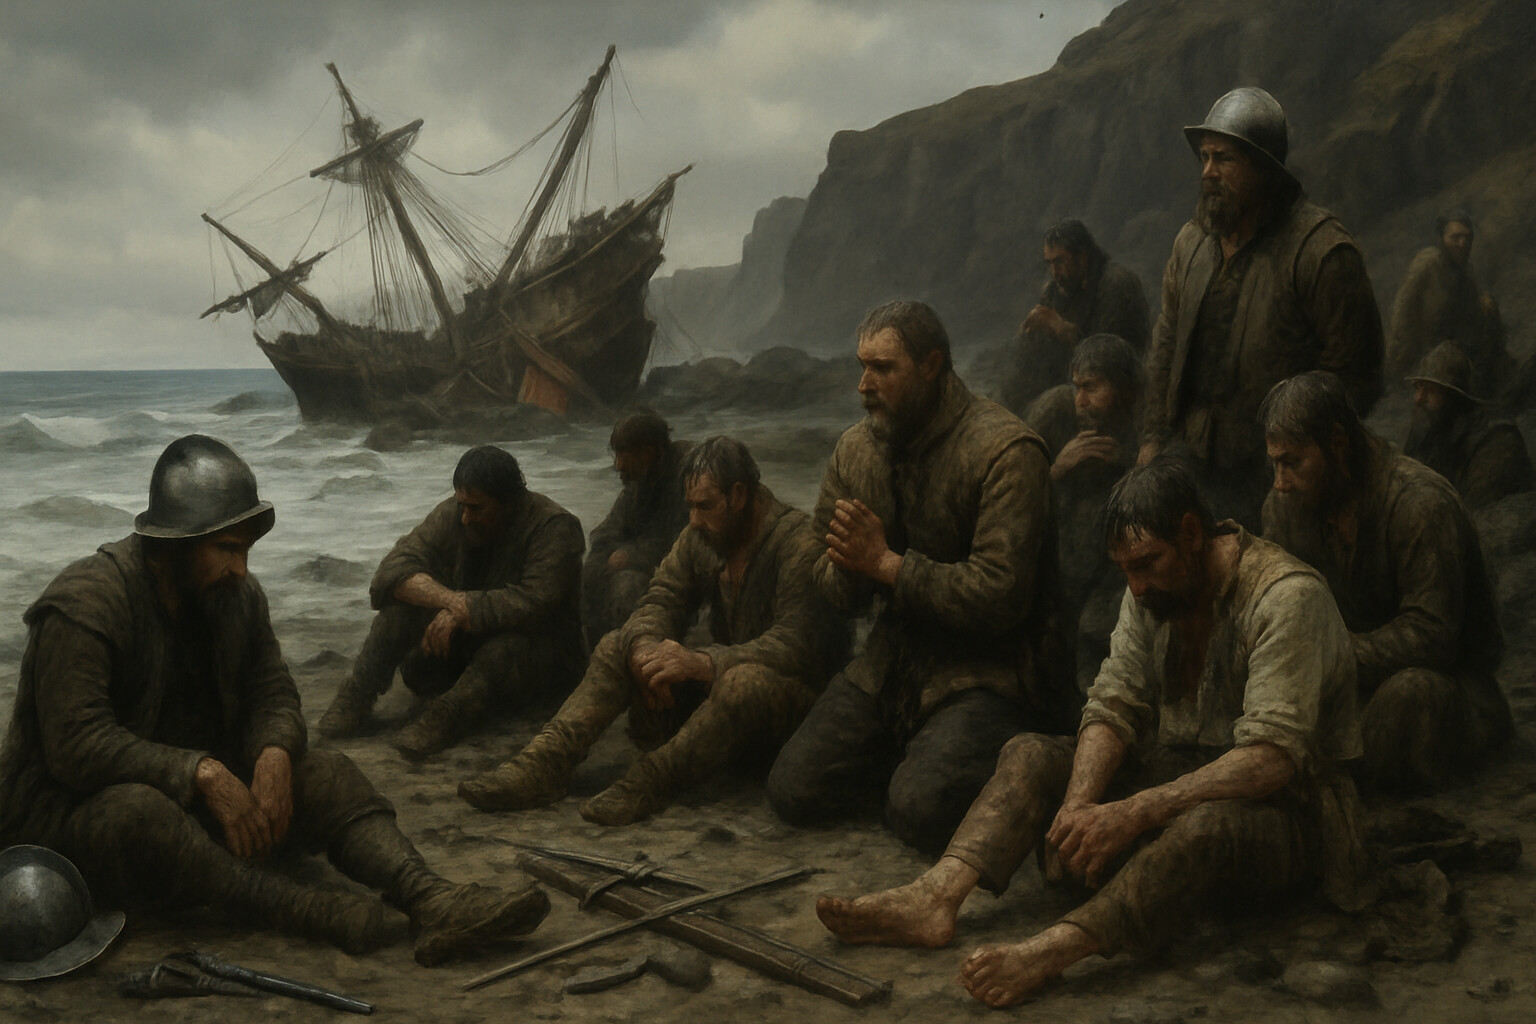
The storms that struck the Armada off the coasts of Scotland and Ireland in August and September 1588 were among the most destructive recorded in sixteenth-century European waters. Modern meteorological analysis suggests a series of deep Atlantic depressions tracking east across the sea approaches, generating gale-force winds and heavy seas. For ships already structurally weakened by battle damage, short of food and water, with anchors cut or cables lost, the storms were catastrophic. Along the Irish coast alone, somewhere between seventeen and twenty-four Spanish ships were wrecked. Most survivors who reached the shore were killed on the orders of the English administration there, which feared an enemy force consolidating on Irish soil.
The total losses are still debated. Of the approximately 130 ships that entered the Channel, roughly half — scholars have offered figures ranging from around fifty to sixty-three vessels — failed to return to Spain. More than half the men who sailed with the Armada were dead. Some died from English shot at Gravelines. Far more died from drowning, exposure, disease, and the violence visited on survivors who reached hostile shores.
Philip II received the news at El Escorial. His reported response — that he had sent his fleet against men, not against storms — appears in several secondary accounts, but the precise wording and original documentary basis vary across sources and should be treated with caution rather than as a verified direct statement. What is documented is that Philip did not abandon his naval ambitions. He rebuilt his Atlantic fleet and launched two more armadas against England in the following decade. Both were turned back by storms before they could engage — a reminder that 1588, decisive as it was, did not permanently end Spanish naval power.
For Charles Howard, the campaign of 1588 was the defining event of his public life. He had commanded a fleet of mixed quality, managed a fractious group of professional sea captains, maintained strategic cohesion across more than two weeks of continuous operations in waters he knew well, and made the key decisions — claiming the weather gauge at Plymouth, deploying the fireships at Calais, pressing the close action at Gravelines — that shaped the outcome. His caution about ammunition expenditure was fully justified; his fleet fought the decisive battle at Gravelines on the edge of what its remaining powder and shot could support. His decision to break off pursuit north of Scotland, when some captains may have wanted to continue, reflected a clear-eyed appreciation of his operational limits.
Howard was not a tactical innovator in the mold of Drake. He was something arguably more valuable in a coalition command: a leader who understood the capabilities and limits of his force, who kept that force together under political and material pressure, and who chose his moments.
In recognition of his role in the victory — and of his broader services across an active decade of Elizabethan naval and court affairs — Howard was created Earl of Nottingham in 1597. He remained an important figure in Elizabethan and Jacobean court politics for decades afterward, eventually dying in December 1624 at approximately eighty-eight years of age. There was no equivalent in Elizabethan England of the formalized medal system that later centuries would develop; officers and commanders were recognized through knighthoods, peerages, land grants, and appointments to offices. Drake, Hawkins, and other commanders from the campaign were knighted. None of this maps onto a modern medal-and-citation framework.
The weapons of 1588 deserve careful attention because the gunnery debate that runs through the Armada campaign is still unresolved among naval historians. The English fleet carried a variety of ordnance, but the guns most significant to the campaign were the long-range culverins: bronze or iron cannon throwing a nine-pound shot for the demi-culverin or a seventeen-pound shot for the full culverin, at effective ranges of roughly 300 to 400 yards for accurate fire, with harassing fire at greater distances. These guns were mounted on four-wheeled truck carriages that allowed the piece to recoil inboard and be reloaded and run out again through the gun port — a practical arrangement that allowed sustained fire in a way that older two-wheeled field carriages did not. The Spanish ships carried a mix of similar long-range guns and larger-bore short-range pieces designed for the boarding fight their doctrine preferred.
The English tactical choice to stand off and fire repeated broadsides at long range was theoretically sound. In practice, the results off Plymouth and along the Channel were disappointing, because the English guns, while accurate at range, were not producing the catastrophic hull damage needed to sink or stop ships. Historians have offered several explanations: English powder was inconsistent in quality; shot sizes may not have matched bores as precisely as later manufacturing would achieve; and English captains, under orders to maintain range, may not have closed enough to achieve the penetrating hits that would disable a hull. At Gravelines, when the English came in closer, the damage to Spanish ships was substantially greater. Archaeological evidence from Armada wreck sites excavated off Ireland from the 1960s onward has added physical detail — actual gun specimens, structural features, recovered shot — that supports and complicates these conclusions in ways that documents alone could not.
The fireship attack was not a gunnery action at all, but it was the critical enabling event: it forced the Armada out of formation and made Gravelines possible.
The record of the 1588 campaign rests on a substantial body of primary documentation. Howard wrote detailed dispatches to the Privy Council throughout the campaign; many survive in the State Papers at Kew and have been published in edited collections. Medina Sidonia kept a log and wrote reports to Philip II, portions of which have been translated and published. Several English captains left accounts, including an anonymous narrative sometimes cited in secondary sources — its authorship is uncertain, and it should be used with appropriate caution. The Spanish records, held primarily at Simancas, have been analyzed extensively by Spanish and international scholars.
The scholarly treatment of the Armada is enormous. Garrett Mattingly's The Armada, published in 1959, remains a landmark of accessible scholarly narrative. Colin Martin and Geoffrey Parker's The Spanish Armada, published in 1988 and revised since, incorporates archaeological evidence from the Irish wreck sites, adding material detail that documents could not provide. N. A. M. Rodger's The Safeguard of the Sea provides essential naval context. These works and the primary sources they draw on form the foundation for the factual claims in this account.
Some details remain uncertain or disputed. The exact number of English ships varies by source and by moment in the campaign. The precise sequence of events at Gravelines, including Howard's movements during the battle, is reconstructed from multiple accounts that do not always agree. Drake's behavior on the night of July 21–22 — the extinguishing of his lantern and the capture of the Rosario — was controversial at the time and has been interpreted variously ever since. The attribution of specific fireship vessels to specific captains cannot be established with full certainty from available records. These uncertainties are inherent to a campaign of this scale and this era, and this account has tried to mark them where they arise.
What is not in dispute is the outcome. The Armada entered the Channel as the most powerful naval expedition Spain had yet assembled. It came out the other side broken, its mission failed, its ships and men lost by the hundreds. The English fleet had done that, under the command of Charles Howard, with tactical tools — the weather gauge, the culverin broadside, the fireship — that would shape naval warfare for the next two centuries.
The Channel that summer was the boundary between one world and another. England remained Protestant, remained independent, and remained — increasingly — a maritime power whose ambitions would eventually carry it far beyond the waters where it had, in the summer of 1588, first shown what an organized fleet under disciplined command could achieve.