The signals came in fragments.
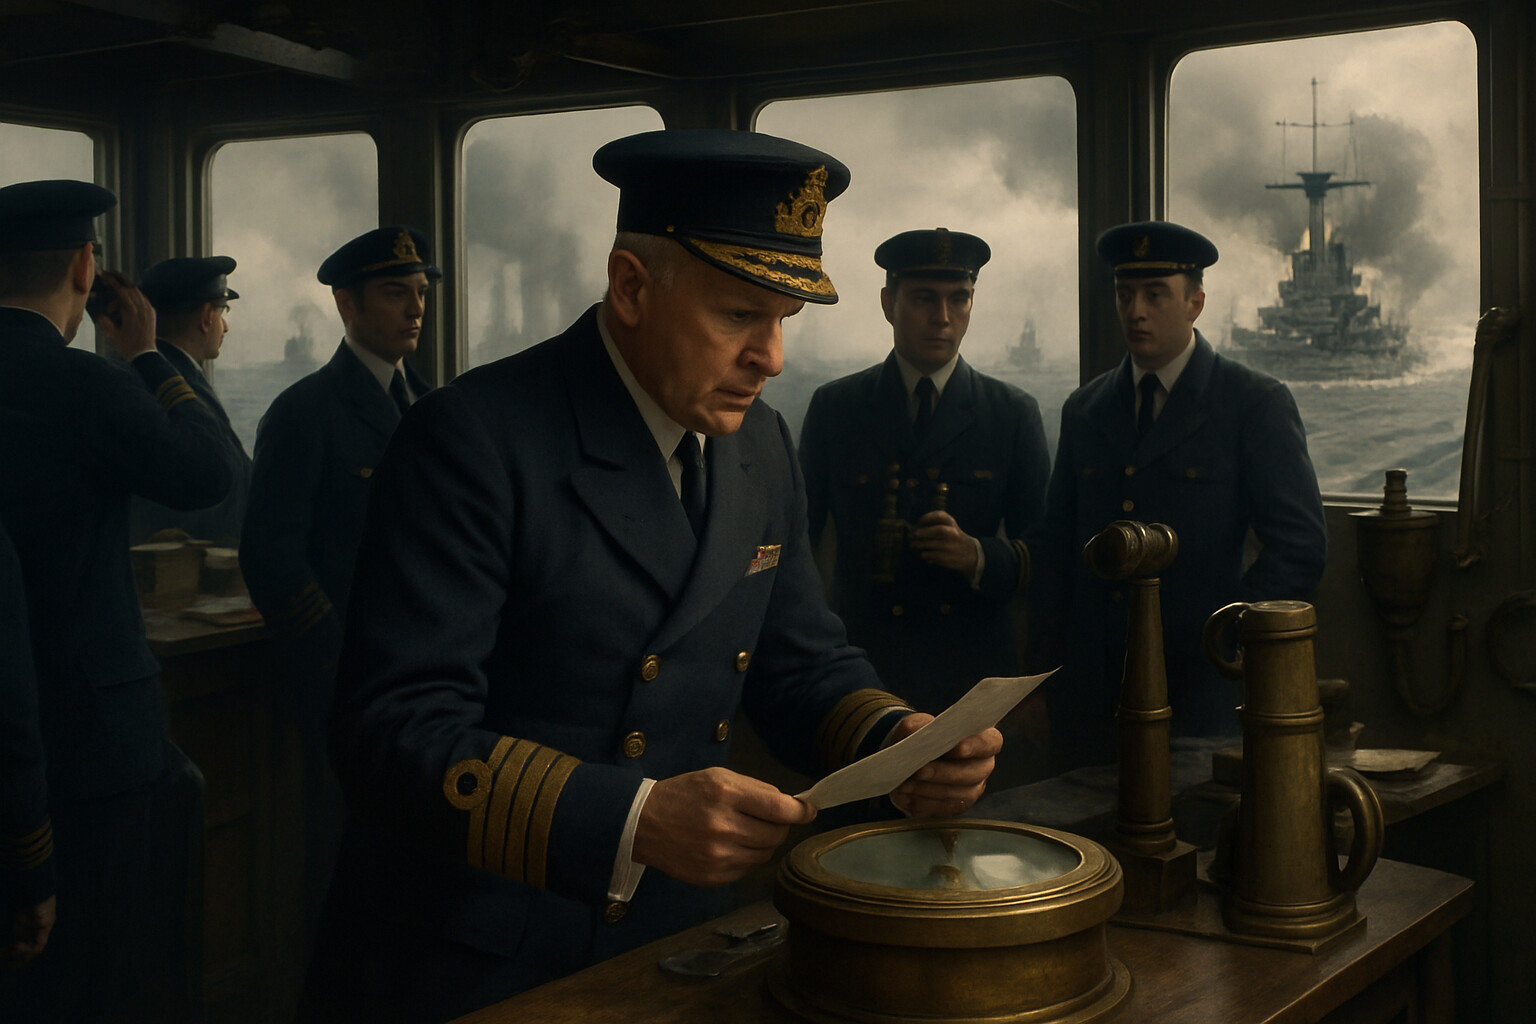
At 6:01 in the evening of 31 May 1916, aboard HMS Iron Duke steaming south through the grey North Sea, Admiral Sir John Jellicoe stood on the bridge of his flagship and tried to reconstruct a battle from second-hand reports, poor visibility, and the distant thunder of guns he could not yet see. His scouting forces were in contact with the enemy. That much was certain. What was not certain — not yet, and perhaps not for some time — was where exactly the German High Seas Fleet was, on what heading it was moving, and at what range the two forces would converge when Jellicoe finally ordered his twenty-four dreadnought battleships out of their six-column cruising formation into a single line of battle.
The window for that decision would be narrow. Deploy too early or on the wrong flank, and the Grand Fleet would present its vulnerable bow-on profile to the German guns. Deploy too late, and the columns would be in disorder when the fleets merged. Deploy correctly — crossing ahead of the German line, forcing them to fight into the setting sun and the smoke — and Jellicoe would have achieved what every fleet commander sought: crossing the T, raking the enemy line down its length while his own ships presented only their narrowest profile.
He had perhaps minutes to decide. He had been preparing for this moment his entire career.
---
John Rushworth Jellicoe was born in Southampton on 5 December 1859, the son of a merchant sea captain. He entered the Royal Navy as a cadet in 1872, and his career became a careful accumulation of technical expertise, administrative competence, and the kind of steady professional reputation that earned the confidence of powerful patrons. He served under Admiral Sir George Tryon and was aboard HMS Victoria when it was rammed and sunk by HMS Camperdown in 1893 — one of the Royal Navy's most catastrophic peacetime disasters, which Jellicoe survived. He served in the Boxer Rebellion in China in 1900, was wounded, and returned to England to continue his rise through the naval hierarchy.
By 1914, First Sea Lord Admiral Sir John Fisher regarded Jellicoe as the one man capable of commanding the Grand Fleet in war. A formulation widely attributed to Winston Churchill — that Jellicoe was the only man on either side who could lose the war in an afternoon — circulated among naval and political circles of the period and has been extensively quoted in the historical literature, though the precise original source in Churchill's own documents should be confirmed before it is presented as a directly attributed remark. Whatever its precise origin, it captured a genuine strategic reality. Britain's food imports, its troop movements, its ability to sustain the war at all depended on keeping the North Sea under British control. The German High Seas Fleet did not need to defeat the Grand Fleet outright to win; it needed only to reduce it enough that British maritime superiority dissolved.
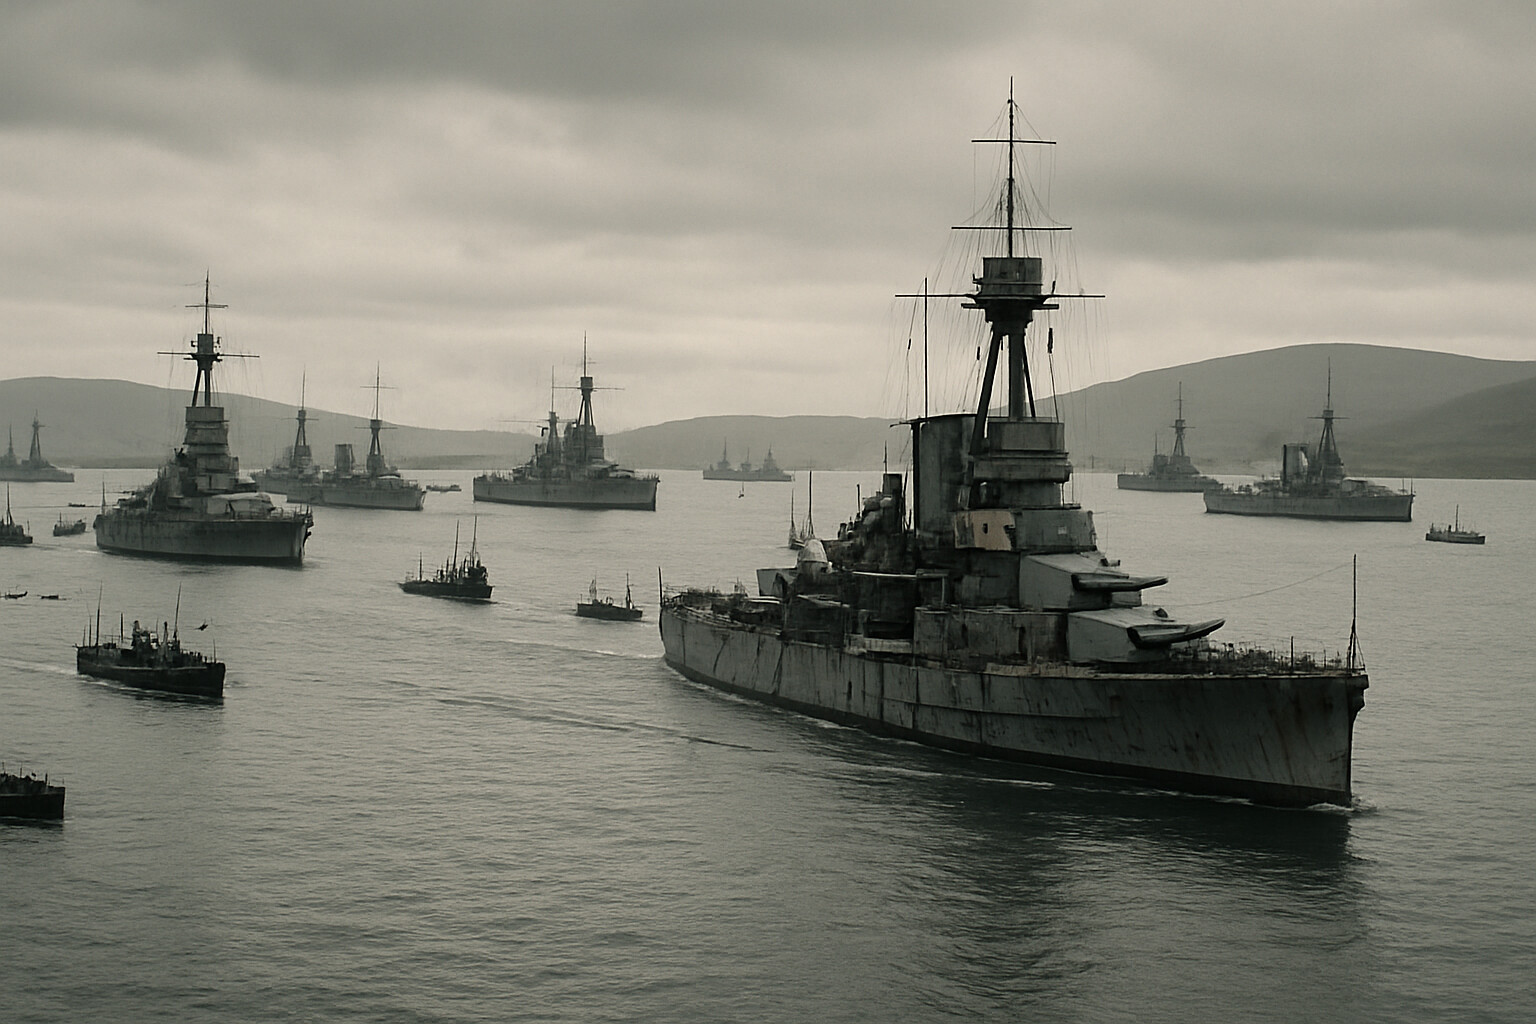
When war came in August 1914, Jellicoe took command of the Grand Fleet at Scapa Flow in the Orkney Islands — one of the most remote, exposed, and strategically vital anchorages in the world. For nearly two years, he drilled the fleet, refined its tactical doctrine, and waited for the Germans to come out.
The Germans, under Admiral Reinhard Scheer, were not idle. Their fleet doctrine centred on Kleinkrieg — attrition warfare — hoping to lure out portions of the Grand Fleet, engage them with submarines and mines, and gradually reduce British numerical superiority before risking a decisive engagement. Several sorties in 1914 and 1915 had produced limited actions — the Battle of Heligoland Bight, the Dogger Bank engagement — but no fleet meeting.
By May 1916, Scheer had a new plan. He would send his battlecruisers under Vice-Admiral Franz von Hipper south along the Danish coast to draw British reaction, then pull British forces back onto the waiting guns of the full High Seas Fleet. It was a trap built on the assumption that the British would react predictably, that submarines and mines would erode the British van, and that the High Seas Fleet could inflict crippling losses before turning for home.
What Scheer could not know was that British Naval Intelligence had broken German naval codes. Room 40 at the Admiralty had been reading German signal traffic for months. When the High Seas Fleet prepared to sortie on 30 May 1916, the Admiralty detected the movement and signaled Jellicoe to put to sea.
By the evening of 30 May, the Grand Fleet was already moving south from Scapa Flow and Cromarty. Vice-Admiral Sir David Beatty's battlecruiser fleet had left Rosyth. The trap Scheer had set for the British was moving into position — but so was every major warship Britain possessed.
---
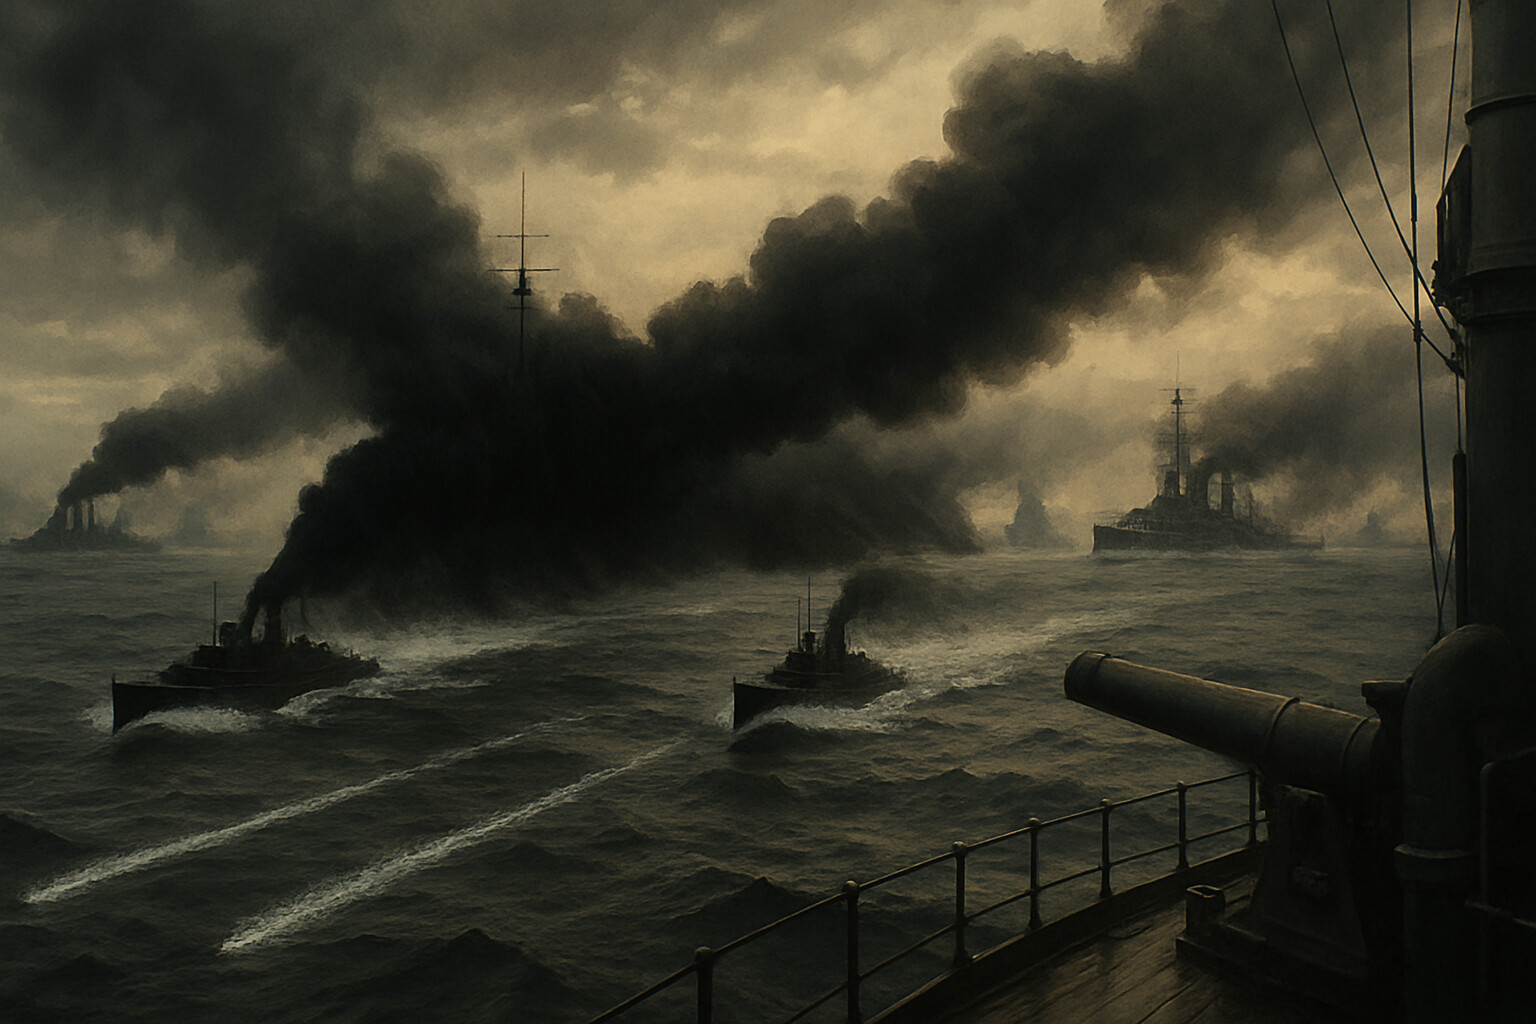
The geography of the engagement mattered enormously. The North Sea in late May sits at the edge of the long northern twilight; the sun on 31 May 1916 would not set until after 9 p.m., but by late afternoon the sky was already obscured by haze, funnel smoke, and the murk that gun salvoes generate across miles of open water. Visibility varied widely — sometimes twelve miles or more, sometimes under five. This was not a clear-sky battle where ranges could be read cleanly and formations seen whole. It was a battle fought in rolling smoke and uncertain distance, where the first warning of danger was sometimes a salvo landing close aboard.
The North Sea floor in the battle area is shallow — rarely more than one hundred to two hundred feet — which mattered for submarine operations but not for the surface action. What mattered on the surface was the wind, which ran at roughly Force 3 from the northwest, and the light, which was increasingly problematic for the British as the afternoon advanced. Ships fighting to the west in the afternoon would be silhouetted against the lighter western sky; ships fighting to the east would be harder to see against the darker eastern horizon. This asymmetry of light would shape the battle's afternoon phase more than any single tactical decision. The reconstructed wind and visibility conditions here are drawn from general historical accounts; exact conditions at specific fleet positions at specific times are estimates, not measurements.
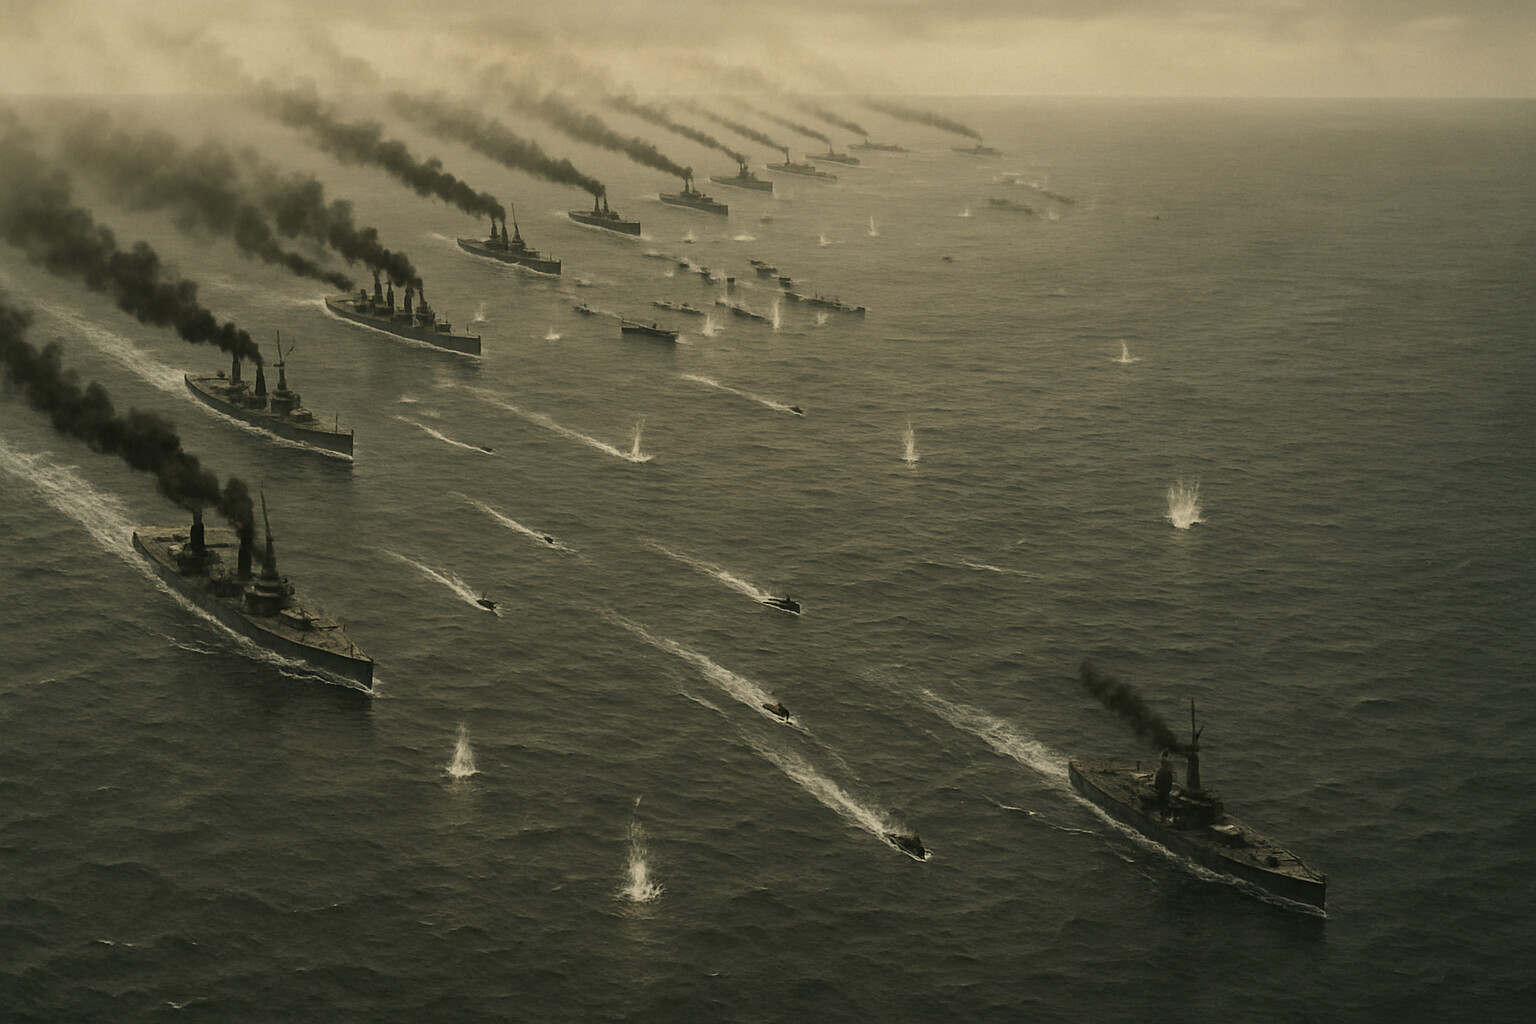
The British Grand Fleet at Jutland consisted of the main battle fleet under Jellicoe — twenty-four dreadnought battleships organized into six divisions — plus Beatty's Battlecruiser Fleet of six battlecruisers and four fast Queen Elizabeth-class battleships under Rear-Admiral Hugh Evan-Thomas, cruiser squadrons, destroyer flotillas, and supporting vessels. The total force ran to 151 ships. The German High Seas Fleet under Scheer comprised sixteen dreadnoughts, six pre-dreadnoughts, five battlecruisers under Hipper, cruisers, and destroyers — approximately ninety-nine warships in all. In tonnage, firepower, and numbers, the Grand Fleet substantially outmatched its opponent, though not crushingly.
The British dreadnoughts were organized into a cruising formation of six parallel columns, each column four ships deep. To fight, they needed to form a single line ahead — a column perhaps five miles long — which would allow every ship's broadside to bear simultaneously. This deployment maneuver, practiced obsessively at Scapa Flow, was among the most complex evolutions a fleet could execute. Done under enemy fire, in poor visibility, with accurate intelligence about the enemy's position incomplete, it was extraordinarily demanding.
---
The battle opened not with Jellicoe's dreadnoughts but with Beatty's battlecruisers.
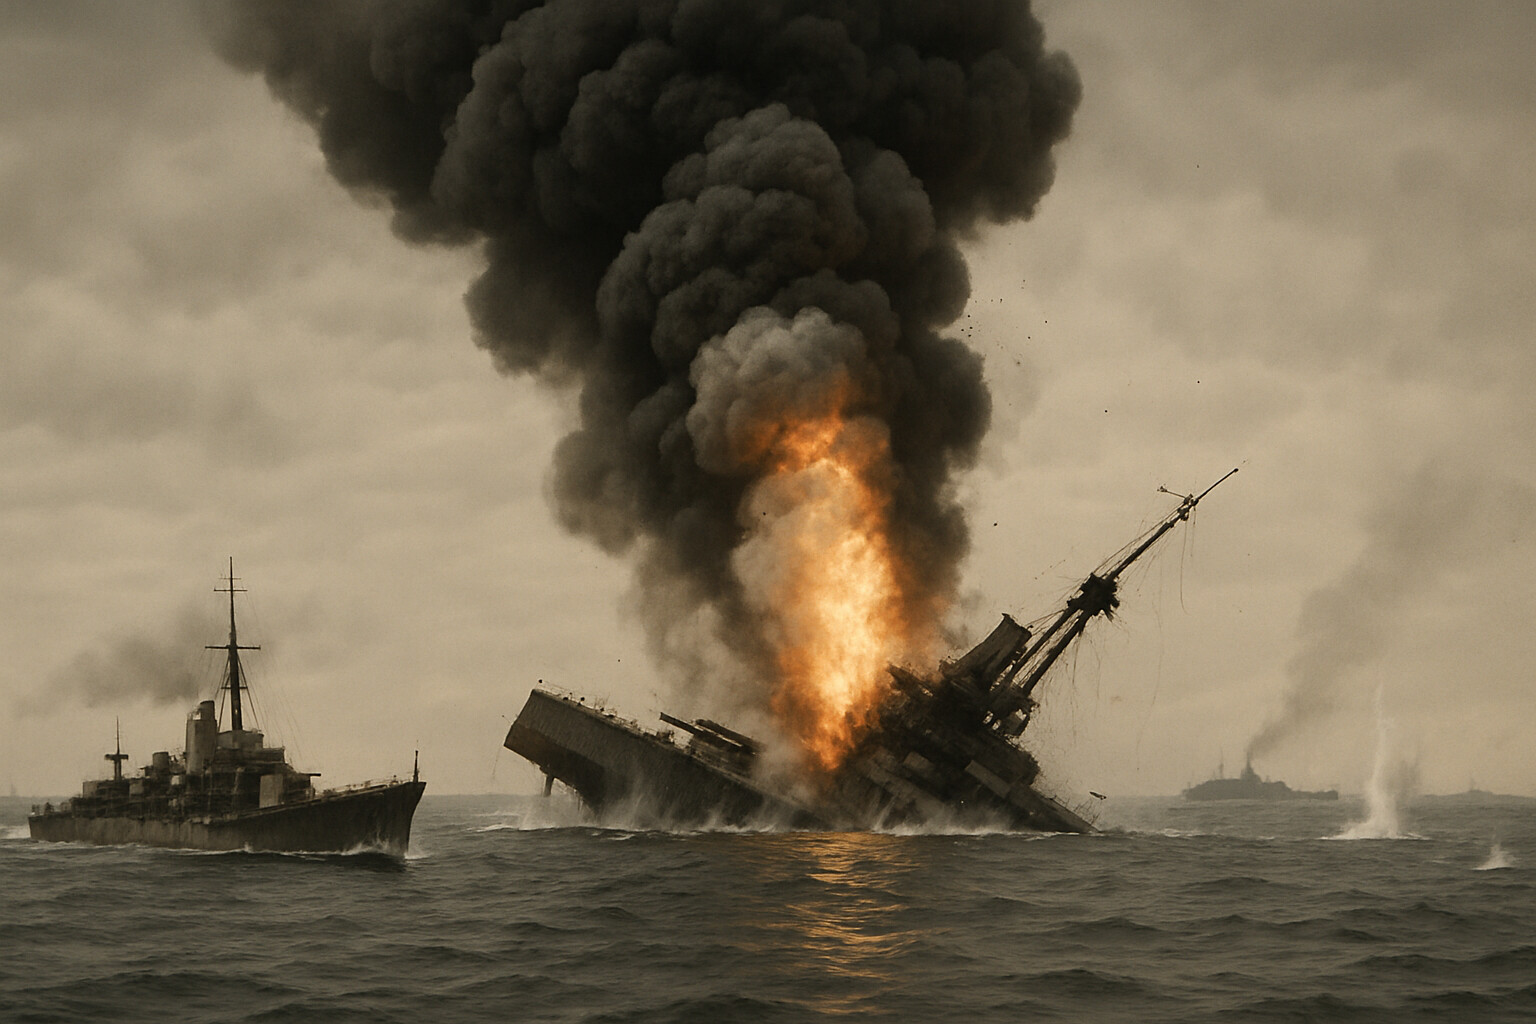
At approximately 2:20 in the afternoon of 31 May, Beatty's force spotted Hipper's battlecruisers. The two forces converged at high speed, and by roughly 3:48 p.m. the action was general. What followed in the next hour became one of the most painful demonstrations of British battlecruiser vulnerability in naval history. HMS Indefatigable, struck by salvoes from SMS Von der Tann, blew up and sank at approximately 4:03 p.m. with the loss of nearly all of her complement of over a thousand men. HMS Queen Mary, hit by salvoes from Derfflinger and possibly Seydlitz, blew up at approximately 4:26 p.m. with similarly catastrophic losses.
The German shells had found the magazine spaces through deck and turret penetrations — a vulnerability attributed variously to British armor design, to cordite handling practices that prioritized rate of fire, and to design choices that left magazine approaches inadequately protected. The explosions that destroyed both ships were near-instantaneous in terms of crew survival.
Beatty's reported remark that there seemed to be something wrong with their bloody ships that day is widely quoted in the historical literature. Its precise wording and immediate context, however, rest primarily on later accounts rather than contemporaneous documentation; it should not be presented as a verbatim record. Whether or not those were the exact words spoken, they reflect accurately the visible character of the moment: two battlecruisers had been destroyed in under ninety minutes, and the force that had suffered those losses was still in action.
Yet the situation was not simply a British disaster. Beatty had drawn Hipper south, and behind Hipper came Scheer's entire battle fleet. Beatty now reversed course and ran north, drawing the German fleet toward Jellicoe's battleships. This phase — sometimes called the Run to the North — was Beatty's primary tactical achievement of the day, whatever losses his force had suffered in the preceding action.
At roughly 6:00 p.m., the two main fleets were converging. The Grand Fleet was steaming south in its six-column cruising formation. Somewhere ahead, in the smoke and haze, Beatty's forces were running before the German battle fleet. Jellicoe needed to deploy.
---
The deployment decision at approximately 6:15 p.m. is the central tactical moment of the battle and the central moment of Jellicoe's command.
The intelligence he had received about the German position was imprecise, incomplete, and in some respects contradictory. Jellicoe had to choose which flank to deploy on: turning his columns to form a line ahead to port — eastward — or to starboard — westward. Deploying to port would place the Grand Fleet east of the Germans, silhouetting the enemy against the lighter western sky and crossing ahead of their line. Deploying to starboard would be faster but risked the fleet's van becoming entangled with German forces before the line was formed.
At 6:15 p.m., with Beatty's ships still streaming through his forming columns and visibility reducing, Jellicoe ordered deployment to port. The six columns began their turn to form a single line of battle extending roughly six miles across the sea.
The maneuver required approximately twenty minutes to complete. German observers later confirmed that the Grand Fleet had succeeded in crossing the T of the High Seas Fleet — the position in which a fleet places itself perpendicular to the enemy's line of advance, able to bring all guns to bear while the enemy can answer only with its forward turrets. Scheer found his fleet steaming into the concentrated fire of the entire British battle line.
Scheer's response was a maneuver the German fleet had practiced and Jellicoe had not fully anticipated: the Gefechtskehrtwendung, or battle turnaway, in which every ship in the German line reversed course simultaneously, turning away from the British behind a smoke screen laid by destroyers. It was a rehearsed evolution, executed under fire with considerable precision. Scheer disengaged, turned west toward home in the smoke and failing light, and the battle line lost contact.
Jellicoe did not pursue aggressively. He turned the Grand Fleet south and slightly west — placing himself between the Germans and their home ports — but did not press through the smoke screen at high speed. His reasoning, as he later explained it and as most subsequent analysts have accepted as rational given the constraints he faced, was that a high-speed pursuit through smoke in uncertain waters against an enemy that had already used torpedo attacks risked catastrophic loss without certainty of result. He held formation and moved to cut the Germans off.
At approximately 7:10 p.m., the fleets were in contact again. A second exchange of gunfire followed, with the Grand Fleet again achieving a superior position. Scheer again ordered the battle turnaway, again covered by destroyers laying smoke and launching torpedo attacks. The torpedo attacks forced Jellicoe to turn the Grand Fleet away from the German line to open the range — a precautionary turn consistent with Royal Navy doctrine of the period, and one that critics have argued cost him any remaining chance of a decisive result.
As the light finally began to fail — the long northern twilight merging into genuine darkness after approximately 9:30 p.m. — the fleets lost clear contact. Night actions developed on the margins of the fleet as German forces cut across the British wake and pressed for their home ports. British destroyer flotillas fought sharp, close-range engagements in the darkness against German cruisers and destroyers. HMS Black Prince, an armored cruiser, was surrounded by German battleships in the darkness and destroyed with the loss of all hands. Several British and German destroyers were lost in the confused fighting that followed.
By dawn on 1 June 1916, the High Seas Fleet had reached its home ports. The Grand Fleet was at sea, depleted, short of fuel in some units, and without a decisive result to show for the previous evening's fighting.
---
The losses on both sides were severe, though uneven in different ways.
The Royal Navy lost three battlecruisers — HMS Indefatigable, HMS Queen Mary, and HMS Invincible, the last destroyed in a magazine explosion during a different phase of the battle — along with three cruisers and eight destroyers. Approximately 6,094 British sailors were killed. The loss of Invincible carried its own particular weight: she was the lead ship of her class, had served at the Falkland Islands in 1914, and went down with nearly all hands in a sudden magazine explosion visible to nearby ships. The exact survivor counts for each ship vary slightly between sources; figures cited here are drawn from the standard historical accounts and should be verified against official records at the National Archives or the Commonwealth War Graves Commission before use in any public accounting.
The German High Seas Fleet lost one battlecruiser — SMS Lützow, which sank while being towed after sustaining heavy damage — one pre-dreadnought battleship, four cruisers, and five destroyers. Approximately 2,551 German sailors were killed.
In raw numbers, the count favoured Germany. The German press and government initially proclaimed a victory, and in a narrow accounting of ships sunk and men killed, the German claim had surface validity.
But the strategic outcome belonged to Britain.
The High Seas Fleet never again challenged the Grand Fleet for control of the North Sea in open battle. When it sortied in August 1916, an encounter with the Grand Fleet drove it back to port. In April 1918, a final sortie turned back without engagement when Scheer learned the Grand Fleet was at sea. The British blockade of Germany — already tightening by mid-1916 — remained in force. German merchant access to the Atlantic remained severed. The naval balance that Jutland had contested was not materially altered by the battle's outcome.
The formulation frequently attributed to Churchill — that Scheer had assaulted his jailer but was still in jail — captures the strategic result with some precision, whatever its documentary origins.
---
Jellicoe's conduct at Jutland became, and has remained, one of the most analyzed command decisions in naval history. The criticisms are real and have been pressed seriously by credible historians.
His failure to pursue more aggressively after the first German battle turnaway is the central charge. Critics argue that a faster, more aggressive pursuit through the smoke — accepting some risk of torpedo attack — could have brought the fleets back into close action before dark and might have produced a decisive result. Admiral Beatty, who later succeeded Jellicoe in command of the Grand Fleet and whose own conduct at Jutland was itself the subject of sustained controversy, was among those who held this view.
The defense of Jellicoe is equally serious. He was commanding twenty-four battleships in deteriorating visibility against an enemy whose mine-laying and submarine activities were established hazards. British torpedo defense doctrine at the time directed turning away from a torpedo attack as the correct response — a doctrine widely shared in the Royal Navy and codified in Jellicoe's Grand Fleet Battle Orders. A mass torpedo attack on the British line carried the potential to sink multiple battleships without warning. No commander in 1916 had found a reliable tactical answer to the torpedo fired at close range in low visibility. Given the asymmetry of the strategic situation — that Jellicoe could lose the war but could not win it at Jutland — a degree of tactical caution was arguably correct even if it meant forgoing a chance at annihilation of the German fleet.
The debate is not resolved, and serious historians of the period remain divided. What is not disputed is that the Grand Fleet remained effective, the German fleet did not break out, and British maritime control of the North Sea continued.
In November 1916, Jellicoe was appointed First Sea Lord, removed from direct fleet command and placed in the broader role of directing naval strategy. He was replaced in command of the Grand Fleet by Beatty. In December 1917, Jellicoe was dismissed as First Sea Lord by First Lord of the Admiralty Sir Eric Geddes — a removal that was controversial at the time and has remained so, reflecting political pressure and personal friction as much as any identifiable failure of strategic judgment on Jellicoe's part.
He was raised to Viscount Jellicoe of Scapa in 1918 and to Earl Jellicoe in 1925. He served as Governor-General of New Zealand from 1920 to 1924. He died on 20 November 1935 and was buried in St. Paul's Cathedral, beside Nelson and Collingwood — a placement that reflects clearly how the Royal Navy and the British state regarded his service across a long career.
---
The men who crewed HMS Iron Duke and the ships around her occupy a different layer of the battle's history.
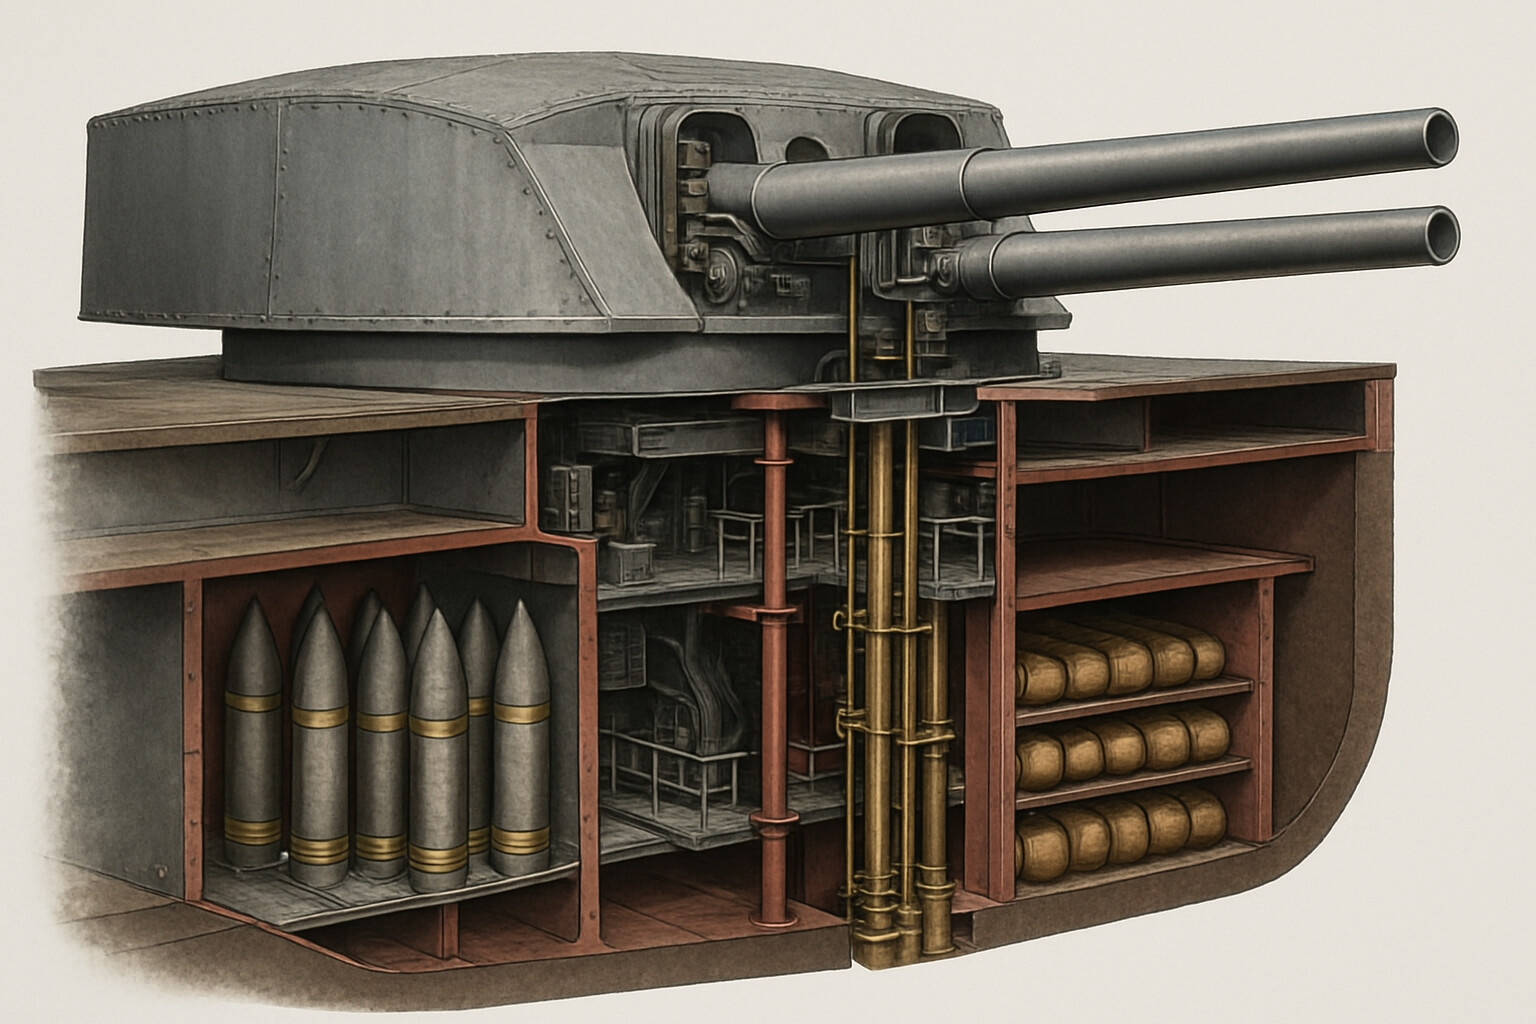
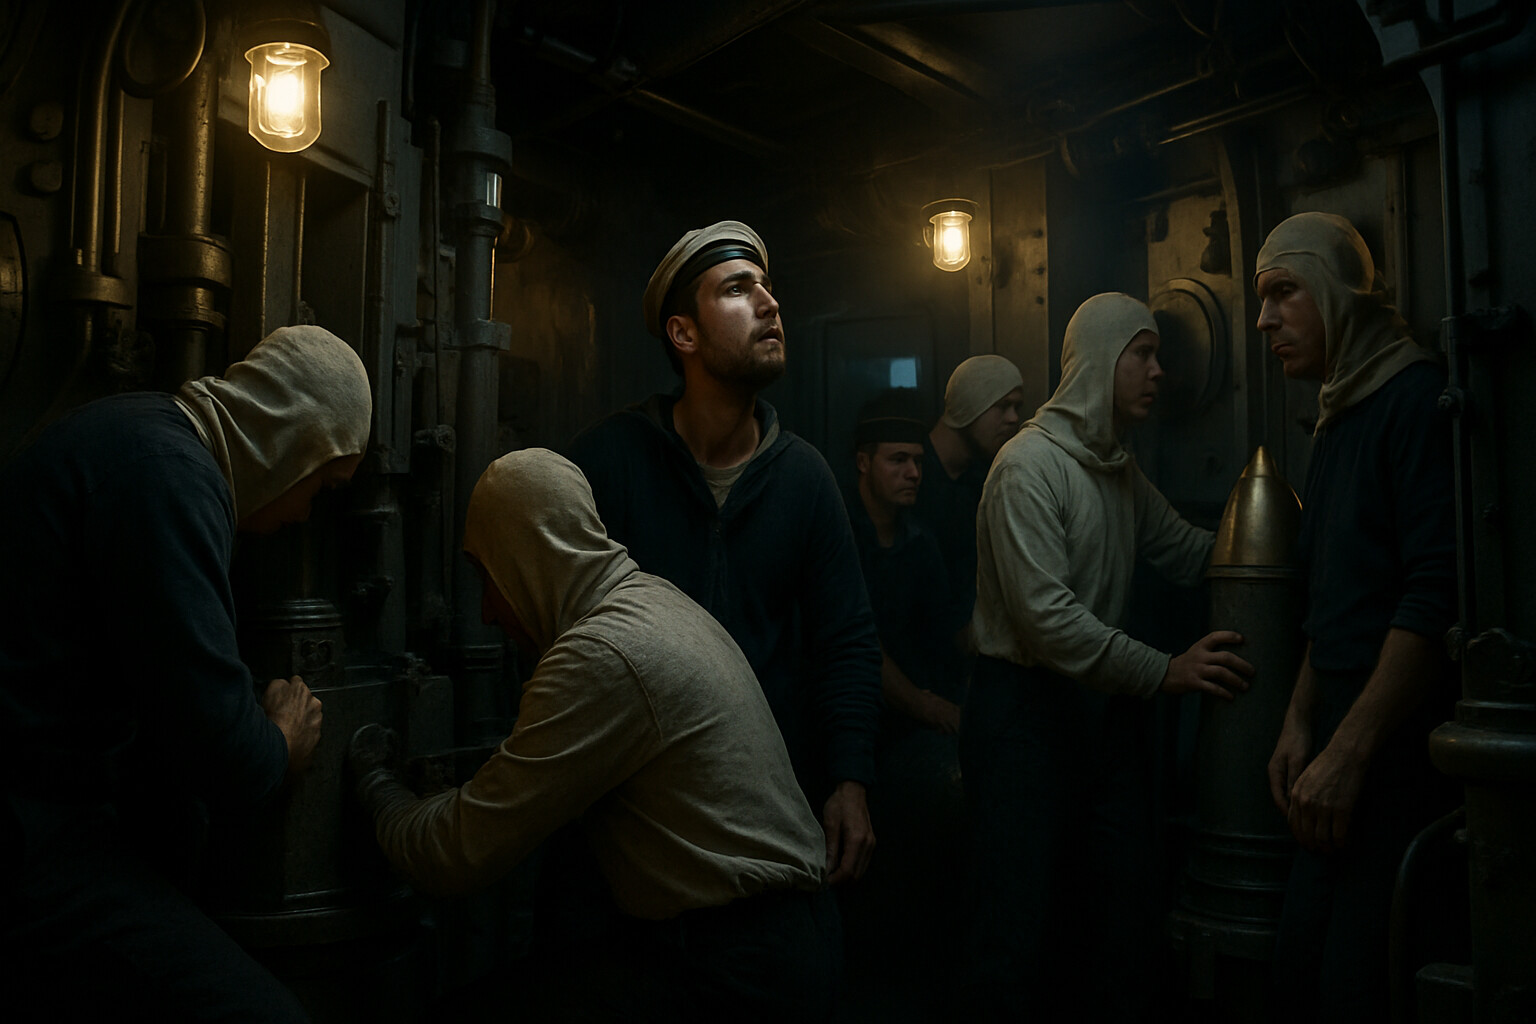
Iron Duke herself was an Iron Duke-class dreadnought battleship commissioned in March 1914, armed with ten 13.5-inch guns in five twin turrets. Her crew of approximately 1,022 officers and men had trained at Scapa Flow through nearly two years of North Sea winters, readying for an engagement that for months seemed never to come. When the signals finally arrived on the afternoon of 31 May, the men moving to action stations, loading the great turrets, and taking their positions at damage control points were doing what they had prepared for — but in conditions that matched almost nothing they could have trained against in full.
Those conditions — the smoke, the poor light, the fragmentary signals, the sudden violence of a magazine explosion visible on the horizon — were experienced by men distributed across dozens of ships who had no view of the battle except through a porthole, a rangefinder, or the flash of guns at unknown distance. The battle at the command level and the battle as it was lived by an engine room artificer or a turret crew rating were almost entirely different experiences of the same event. No specific crew accounts have been drawn upon here; the description reflects the general record of action conditions rather than any individual's testimony.
The men who went down with Indefatigable, Queen Mary, and Invincible had almost no warning. The explosions that destroyed these ships were near-instantaneous in terms of crew survival. British naval losses at Jutland were heavily concentrated in these catastrophic sinkings rather than distributed across gradual attrition. That concentration — thousands of men dead in seconds, on ships that gave no warning before they were gone — shaped how the battle was remembered in the Royal Navy for a generation.
Survivors from Jutland's smaller losses — destroyers and cruisers — spent varying periods in the North Sea before rescue, in water temperatures that permitted survival for only limited time. Rescue was complicated by ongoing action, by darkness, and by the practical difficulties of locating men in the sea from a moving warship.
---
The record of Jutland has been examined more thoroughly than almost any other naval engagement in history.
Julian Corbett's Naval Operations, Volume III, published in 1923 as part of the official British History of the Great War series, provides the foundational British account, drawing on signals logs, ships' logs, reports of proceedings, and interviews with surviving officers. The German official account, Der Krieg zur See, provides the German perspective in similar depth. Both were produced while participants were still available for consultation, though both were also shaped by the institutional interests and national perspectives of their authors.
Admiral Jellicoe's own account, The Grand Fleet 1914–1916, published in 1919, is a primary source of significant value and significant limitation. It represents Jellicoe's own explanation of his decisions and their reasoning, but it is also a defense of those decisions written by the man who made them. It should be read alongside, not instead of, the official histories and the critical accounts.
The Harper Record — an official narrative compiled by Captain John Harper in 1919 at the Admiralty's direction — became itself a subject of controversy when its publication was delayed and its conclusions about the relative performances of Jellicoe's and Beatty's forces became entangled in the ongoing professional antagonism between the two admirals' supporters. The delays and revisions to the Harper Record are a caution about the extent to which official historical accounts can be shaped by the reputational interests of those they describe. The full publication history of the Harper Record, including the specific role of external interventions in its revision, is summarized here from secondary literature; primary archival research in the Admiralty papers at the National Archives would provide greater precision.
On the German side, Scheer's account, Germany's High Seas Fleet in the World War, published in 1920, provides essential context for understanding German intentions and the experience of the battle turnaway maneuvers from the fleet that executed them.
For anyone seeking to understand Jutland fully, John Campbell's Jutland: An Analysis of the Fighting (1986) provides the most systematic technical analysis of the gunnery exchange, and Andrew Gordon's The Rules of the Game (1996) places the battle's command failures in the context of the Royal Navy's broader doctrinal and cultural history. Both are indispensable starting points.
---
One hundred and eight years after the guns fell silent, the sea off Jutland contains the remains of ships and men from both fleets. Some of the wrecks are war graves under British and German law, periodically visited by divers working under strict regulations. HMS Queen Mary lies at roughly 57 degrees north, 5 degrees east — approximate coordinates drawn from standard historical accounts; verified wreck survey coordinates from UKHO records would improve precision. The debris fields are extensive, encompassing turret armor, machinery, and structural remains of ships that were among the most technically advanced objects built at the time of their construction.
The battle's legacy is contested in ways that mirror its tactical ambiguity. It was not a Trafalgar — no enemy fleet was annihilated, no commander fell at the moment of triumph. It was something more characteristic of the industrial, organizational, attritional warfare that defined the First World War as a whole: a massive collision of industrial power that produced heavy casualties on both sides, failed to deliver the decisive blow either fleet sought, and left the underlying strategic situation changed in small but durable ways.
The British blockade continued. The German fleet remained confined. The war at sea in the North Sea was effectively settled at Jutland not by what happened but by what did not happen: the Grand Fleet survived intact, and the German navy never again sought to contest it seriously.
For Jellicoe, the battle is inseparable from his reputation, and that reputation has never settled into the comfortable certainty that attaches to commanders who win unmistakably. He commanded the most powerful fleet in the world at the most important naval battle of the war and produced a result that preserved British strategic position while falling short of the destruction of the enemy fleet. Whether a different commander — more aggressive, more willing to accept risk — would have achieved more, or would instead have suffered the catastrophic defeat that British naval strategy existed to prevent, is a question the historical record cannot answer with finality.
What the record does show is a man of meticulous preparation, measured judgment, and genuine moral seriousness about the weight of what he commanded. In an era of industrial warfare that repeatedly exceeded any individual's capacity to fully comprehend or control, those qualities were neither trivial nor sufficient. They were what the situation permitted — and what Jellicoe brought to it.